Retro Tech
A Look at My Process
What is the subject matter and what do I need before I even start?
In my case, it was “what awesome piece of tech from a movie (most likely from the 80s & 90s) would I have loved to own, but now I can make digitally?” Being a bit of a nerd and a complete nostalgia hound for 80s & 90s games, music and movies, it was pretty easy to get a burn-down list together.
- JVC GR-C1: Back to the Future (1985)
- Panasonic RC-6015: Back to the Future (1985)
- Seiko Voice Note M516: Ghostbusters (1984)
- SONY Walkman WM-B39 + MDR-3L2 headphones: Ghostbusters II (1989)
- Sharp GF 7600 Boombox: Ready Player One (2018), Say Anything (1989)
- Motorola DynaTAC 8000x: Wall Street (1987)
- Atari 2600 + Adventure: Ready Player One (2018)
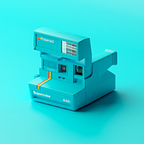
- Polaroid Supercolor 635: It’s just really cool and probably in a bunch of movies (suggestions welcome)
- SEGA Mega Drive + Sonic the Hedgehog: My own childhood (which hasn’t ended yet, for I am still a child)
Once I know what I’m making, I then have to find some reference images to help get the ball rolling. With older tech, this is a bit tricker; the photos are often low quality or there just aren’t enough angles to assist in the 3D environment. For shame.
Usually I hit eBay pretty swiftly, because there’s usually a good chance the thing I’m modelling is out there, and sellers often (if they want a genuine chance of selling the thing) attach a bunch of images…from all angles.
Really handy.
Sometimes, however, I just need the thing. If I’ve got the real thing in my hands, it can help me to better understand the shapes and nuances of the design. Getting my own reference pictures is also a big benefit, although it’s not always feasible to buy the thing I want to model (cost, availability, size and so on).
For the SEGA Mega Drive control pad, after a number of attempts, I just needed to accept I couldn’t model this purely from references online. So I bought it (well, a broken version of it) to aid progress.

Setting Up
Ok, so reference images are really useful, but what next? Well, at this point, I jump into Blender and start getting set up, sometimes using reference images directly in the scene. I don’t always use reference images directly, having made a bunch of things by eye-balling pictures online, but it can make for pretty slow progress and will be inaccurate (which may not always matter of course).
Once reference images are in place within the scene, I start blocking out the basic shapes and then slowly but surely add more and more detail. There are many tutorials out there, no matter how niche or specific you go, so I won’t cover this area. Most of what I learned about Blender pretty much came from Andrew Price (Blender Guru), so if you’re new to 3D and want to look into Blender specifically, I’d start there.


Materials & Nodes
If you want to know a lot about materials, nodes and UV maps, this isn’t the place to be. Again, there are loads of excellent tutorials out there, plenty of which I often refer back to. This part of my article, however, is more for my own reference as these are some things I’ve needed do time and time again.
Setting Up a Master Colour
For the Retro Tech series, each model used one or two prominent colours. I wanted to be able to set up my colour values in one place, and then be able to easily connect to them or make adjustments to the colour values later.
Knowing that each of these models would contain a number of materials (containing logos or typography for buttons and switches), I knew that having a simple method for at least changing the base colour would be very useful. That’s when I first discovered node groups. I still only know ~0.01%* about nodes and their infinite possibilities, but for my needs, this was just fine.
*figure not accurate and likely still over-egging.
Back to the node group and master colour. For this, I only used a single node: RGB. Once added, I change the colour value (roughly, as I can come back and change this at any point later on) and then hit CMD+G to create a NodeGroup. I give that NodeGroup a name that relates to either the colour itself or the model it’ll be applied to, depending on how I’m feeling that day. Hitting TAB opens up the NodeGroup, to allow for changes.

Adding Detail in Materials
This is the fun bit, as I associate this part with being near the end of the project. Usually after many hours of modelling, I can get fidgety, frustrated and just want the damn thing finished already(!) But…once I get to this part, the modelling is probably finished and I can now refresh my head and change up my workflow.
When I’m getting details together to apply to my materials, I use Adobe Illustrator to generate vectors for labels and logos. The output I aim for is a clean white PNG with an alpha channel at a decent resolution that I can then bring into Blender to mix with the master colour I’d set up earlier. I’ll not go into detail about the node setup I use, for two reasons. It’s probably far from the correct way to do this…and I also don’t understand some parts.
Shoot. I’ll give it a go…
So I want to apply my PNG image to a specific part of my mesh. That’s where the Texture Coordinate, Mapping and Image Texture nodes come into play. For my UV Mapping, I typically unwrap using Project from View. If it’s a flat surface, I just find that straightforward.
Then I want to mix the image detail with the master colour of the model. I use the MixRGB node and plug in the image (JVC Controls.png) and master colour (Green 1) outputs into that. I plug the image alpha output into the factor (Fac) of the MixRGB node…and I drop on an Invert node onto the alpha output.


Lighting
The lighting setup for each model in this series is pretty basic. I normally only have a maximum of 3 area lights scattered around. One of those will be large in scale and relatively bright to form the primary light source. The larger scale of the area light creates a very soft shadow, which I just find quite appealing. It’s like applying a diffuser or soft-box, giving more of a studio-lighting aesthetic rather than harsh sunlight.
The other lights in the scene then purely serve to pick out details, or create a little contrast between the model and the floor (which are often the same colour in this series). In addition to these lights, there have been a couple of instances where a reflection object has been used. This is just a white plane that has everything but Glossy turned off in the Ray Visibility options within Object Properties. This object is reflected in other reflective surfaces, but isn’t seen directly by the camera. Great for that shine you get on glass.

Rendering
The last part, rendering, is great because that means you’re at the end of the project. This can also be really annoying or frustrating if you’ve got a crappy machine and the rendering times are so long, but seeing your final image, without the horrendous noise, has always been and will always be satisfying.
Thanks for reading and if you’d like to see the full collection and other work I have made using Blender, please feel free to check out my website, ArtStation and Instagram accounts.
FabricEyes, Art Portfolio: fabriceyes.com
ArtStation: artstation.com/fabriceyes
Instagram: instagram.com/fabriceyes.3d/